Don't Put View Code Into Your View Controller
Sometimes I see code that sets up subviews in viewDidLoad() of a
view controller. Be a good citizen and don’t do that. If you have
to add something to a view, do it in a UIView subclass.
Here is how I implement view and controller code when I’m not using Interface Builder.
The View
Let’s build a login view:
import UIKit

class LoginStackView: UIView {

  let usernameTextField: UITextField
  let passwordTextField: UITextField
  let button: UIButton
  let stackView: UIStackView

  override init(frame: CGRect) {
    usernameTextField = UITextField(frame: .zeroRect)
    usernameTextField.placeholder = NSLocalizedString("Username", comment: "")
    usernameTextField.borderStyle = .Line

    passwordTextField = UITextField(frame: CGRect.zeroRect)
    passwordTextField.secureTextEntry = true
    passwordTextField.placeholder = NSLocalizedString("Password", comment: "")
    passwordTextField.borderStyle = .Line

    button = UIButton(type: .System)
    button.setTitle("Login", forState: .Normal)
    button.backgroundColor = .grayColor()
    button.tintColor = .whiteColor()
    button.layer.cornerRadius = 5

    let textFieldStackView = UIStackView(arrangedSubviews: [usernameTextField, passwordTextField])
    textFieldStackView.axis = .Vertical
    textFieldStackView.spacing = 10
    textFieldStackView.distribution = .FillEqually

    stackView = UIStackView(arrangedSubviews: [textFieldStackView, button])
    stackView.translatesAutoresizingMaskIntoConstraints = false
    stackView.axis = .Vertical
    stackView.spacing = 20

    super.init(frame: frame)
    backgroundColor = .whiteColor()

    addSubview(stackView)

    // MARK: - Layout
    let views = ["stackView": stackView]
    var layoutConstraints = [NSLayoutConstraint]()
    layoutConstraints += NSLayoutConstraint.constraintsWithVisualFormat("|-[stackView]-|", options: [], metrics: nil, views: views)
    layoutConstraints.append(usernameTextField.heightAnchor.constraintEqualToConstant(30))
    layoutConstraints.append(button.heightAnchor.constraintEqualToConstant(40))
    NSLayoutConstraint.activateConstraints(layoutConstraints)
  }

  required init(coder aDecoder: NSCoder) {
    fatalError("init(coder:) has not been implemented")
  }
}
This code defines two text fields and a button and puts it onto the view
with the help of UIStackView (line 26
and 31). If you haven’t played with stack views yet, start now. They are
awesome!
Note that the layout constraints don’t define the vertical position of the stack view on the view. We will add vertical constraints in the view controller.
The View Controller
Here comes the view controller:
import UIKit

class LoginStackViewController: UIViewController {

  var loginView: LoginStackView {
    return view as! LoginStackView
  }

  override func loadView() {
    let contentView = LoginStackView(frame: .zeroRect)

    contentView.button.addTarget(self, action: "login", forControlEvents: .TouchUpInside)

    view = contentView
  }

  override func viewWillLayoutSubviews() {
    loginView.stackView.topAnchor.constraintEqualToAnchor(topLayoutGuide.bottomAnchor, constant: 8).active = true
  }

  func login() {
    print("login")
  }

}
If you build your user interface in code you should override loadView(). Within
loadView() you
need to set the view property of the view controller. In this
example we additionally add a target to the login button.
Note the definition of the calculated property loginView. This is
done to allow the access of the loginView’s stackView in
viewWillLayoutSubviews().
The view controller can be presented within a navigation controller (and
in fact is in the demo project). To position the stack view in respect
to the bottom edge of the navigation bar we use the topLayoutGuide of
the view controller. This takes into account the navigation bar. This
means the code viewWillLayoutSubviews()
puts the stack view 8 points below the navigation bar.
The so defined login screen looks like this:\
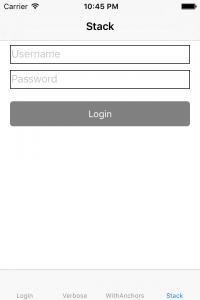
You can find the sample code on github. In the sample project you can also find three other possibilities to define the layout and in addition the version using Interface Builder.
If you enjoyed this post, then make sure you subscribe to my feed.